How to Customise Accentis Enterprise
As a user, there are a number of different ways you can configure your Accentis Enterprise to suit your tastes or your personal preferences
One of the first things you should do is to change the password that you used to log in to Accentis Enterprise. You may want to change your password because you believe that someone has been using it to log in under your username, or you may have been instructed to change your password as part of a regular security review.
To change your login Password:
- On the main menu, select User > Change login password.
- Enter your current password into the Current password field
- Type your new password into the two fields below
- Click OK
Passwords are case-sensitive and can be up to 12 characters long.
Accentis enterprise allows you to change the colour of the text and background of most of the windows within the System. You may want to do this so that they are consistent with your current windows theme or simply because if you do not like the standard colours.
To change the colours of the text and background of Accentis Enterprise windows,
- On the main menu, select User > User preferences
- Click Edit to begin changing your settings
- Change your settings to suit your requirements
- Click Update
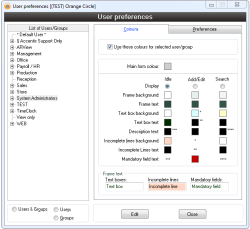
When you enter the User preferences area, you will see a form as follows:
When Accentis Enterprise is first installed, your toolbar area may not have any tabs or buttons created. It is possible to set up User Group buttons and Tabs, to have consistency within different functional areas. Accentis also allows you to customise your toolbar on an individual basis.
Buttons which belong to a user group (and thus are seen by multiple users) have their caption text underlined by default. This is to let the users with permission to move the button, know that the changes they make to that button will affect other users. This also informs users who can't move it without them having to attempt it. If you would like to remove this underline, you can do so in Don't show underline on group toolbar buttons.
Last edit 16/11/23
To add a Tab to your toolbar:
- Open a Button or Add a Button to your Toolbar using the steps below
- In the Tab name field, type in the Tab name here
- Press OK to save. A new tab will now be created on your Toolbar
To add a button to your toolbar:
Reports and Lists
- Open the Report or List you want to add to your Toolbar.
- On the menu of that page, select Special > Add this search to the Toolbar.
- A button allowing quick access to your Report or List will now appear on your Toolbar. If you have multiple tabs already set up, this option will appear on all Tabs
Functions and Reports
These can be added in multiple ways.
Adding functions or reports through a menu:
On any form, use the special menu to add the item to your toolbar.
Go to Special > Add this form to the toolbar > The form will be added to your toolbar automatically.

Adding functions and reports through User options:
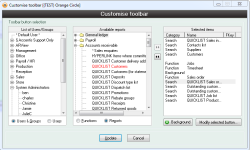
- From the Menu, choose User > Customise toolbar. Click on Edit and choose either Functions or Reports
- In the Available functions or reports panel, expand the module from which you are going to create a button. Any options already selected will be highlighted in red
- Double click on the function or report, or press the >> button, and this will be added to the Selected Items panel on the right side of the window
- When all functions and reports have been added, click on Update and Close
To remove a button on your toolbar:
You can remove a button from your toolbar directly, or through User options.
Remove a toolbar button directly
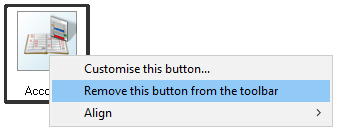
To remove a form from the toolbar, right-click with your mouse on the form > select Remove this button from the toolbar.
To remove a toolbar button through User options
- Right click the Button and select Remove this button from the toolbar.
- Or, from the Menu, choose User > Customise toolbar. Click to highlight the item in Selected Items panel and click on the << Button to remove.
- When changes have been completed, click on Update and Close.
Making changes to multiple buttons at once
It is possible to change more than a single button on the toolbar at the same time. This will improve efficiency and help to make your toolbar more uniform. Changes can also be made to a single button through the Customise toolbar menu, which is detailed below.
Select a range of buttons
There are two ways to select the buttons you want to edit:
- Left-click on your mouse and drag a marquee around the buttons you choose
- Hold Shift + Ctrl and select each button you want to edit
As you make a selection, a black border will highlight the selected toolbar buttons.
Move a group of buttons
Select a range of buttons.
Left-click on your mouse to one of the selected buttons and drag them to where you want them. They will snap to an invisible grid.
Selected buttons are moved and resized the same way as unselected buttons, however the Ctrl key does not need to be pressed. When a selected button is moved, all other selected buttons will keep their position relative to it. When a selected button is resized, all other selected buttons will also be resized by the same amount. To nudge selected buttons a small distance, hold the Alt key and press an arrow key in the direction desired.
Align, space or resize a group of buttons
Select a range of buttons.
Right-click on your mouse one of the buttons and select Align > then choose an option from the menu.
Aligning selected buttons
To align selected buttons, right click on a button and select one of the options starting with 'Align' under the 'Align' menu. This will align the corresponding side of the selected buttons with the one clicked. (e.g. 'Align Right' will move all selected buttons so that their right side is at the same horizontal position as that of the clicked button).
Spacing selected buttons
To space selected buttons evenly, right click on a button and select 'Space horizontally' or 'Space vertically' under the 'Align' menu. This will move all selected buttons so that they are spaced evenly on the axis selected.
Resizing selected buttons to the same size
To set all selected buttons so that their size is the same, right click on a button and select 'Make same size" under the 'Align' menu. The size the buttons will be set to is the size of the button that was right clicked.

To change the properties of a button on your toolbar
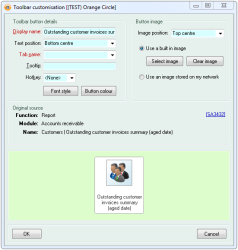
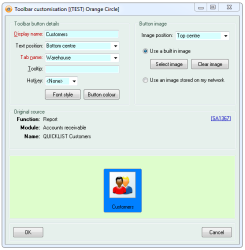
- Right click on the Button and choose Customise this button to open the Toolbar customisation window. Edit the details, location or image of a button
- The Toolbar customisation window can also be located by selecting Modify selected button in the Customise toolbar window as pictured above
- To resize the Button, hold “Ctrl”, move the mouse to the bottom right corner of the button and when the Resize icon appears drag the corner of the Button until it is the required size
To move a button on your toolbar:
- Hold “Ctrl” and hover mouse until the Move icon appears then click and move
- To move the Button to another Tab, right click the Button and select the required Tab
